Friday, 21 September 2012

Lighting Analysis - The great BIM interoperability Debate!


With the project focus on BIM, this provided an interesting opportunity to look at the issue of what software is classed as BIM. As most know, Ecotect is BIM and very typically used to calculate daylighing analysis, however 3ds Max is not. This presented an opportunity to compare the two processes.


Let me first start by explaining that there are essentially two ways of going about this proccess of using ecotect, the first ( which I took and have documented) is to import your file as a DXF into ecotect. This proccess isnt BIM as exporting the project as pure geometry looses the vital information essential to BIM. I learnt this the long way.


This proccess of exporting as DXF had another major implication- many faces = complex + really really realy slow calculation, I mean really Slow! All of this is without materials as well- so the accuracy of this analysis is down the drain- or is rather a study of light levels based off uniform material surfaces..


 The second second proccess ( and essential the correct proccess ) is to Export as a GBXML file which uses room data allocated in revit to calculate basic room geomerty. This also exports basic information such as object data and awareness ( it knows a wall is a wall, and glass is glass). However this is as detailed as it gets, with some vital geometry such as working planes ( desks etc) omitted. This means it has limited capabilities in the later design stages.  It also fails to translate any more detailed material information which poses me to ask the question of how well this integrates with the BIM process if it only brings across basic information?
In addition to this, the program is quantitative based with the only way to acquire qualitative data ( basic at the most) is to import to radiance.

This brings us to the second analysis method used for the project- linking into 3ds Max Design.


 What is great about using 3ds Max Design is its accuracy in both a Quantitative and Qualitative manner; it can measure Illuminance and Luminance using false colour images as well as using the lighting analysis assistance to measure lighting levels at any point in physical space using the light meter tool.


 3ds Max Design calculates all this from material data carried over ( and updated by a linked file) from Revit meaning much more accurate results than Ecotect. In addition to this, photometric data is carried across for artificial lighting analysis. 


 Measuring light levels in the apartments


 Measuring lighting levels from Atrium 


 Illuminance Psuedo Colour Output Image


As mentioned previously, Max also measures light in a qualitative manner based of the material selection made in Revit, including surface properties such a reflectance, colour and transparency, all critical to designing accurate task lighting.

After comparing the two, the question must be asked, could 3ds Max be classed as BIM considering it contains the same amount of data as an ecotect file, while providing a more detailed analysis and using a constant link to the revit project? If not what is needed for this to become BIM integrated?


Thursday, 20 September 2012

[17] Design Brief Response


Design Brief Response

This document has been created for the sketch design phase of the project to show the client of the direction the design is heading for the MCN Project. This design brief response is also a document which will be forwarded to all the design consultants involved in the project (Interior, Lighting and Landscape) to ensure the direction of the architect and the outcomes we are trying to achieve for the project. Its a visual represention of the style, atmosphere and design language to flow through all design stages of the project. Consultants are able to look at this document for guidance in collaboration with the architect.

[16] Precedence - Tom Kundig Artist Studio


Precedence - Tom Kundig Artist Studio

One of the precendence we found to encourage and inspire the design for the MCN Project is Tom Kundig's Artist studio. This architecture oozes flexibility and adability, working for the artist rather than resitricting them. The building has a large scale industrial feel to it much like the existing building for the MCN project. Key design elements taken from this building include:
  • flexible, adaptive studio spaces with moveable walls
  • high ceilings
  • mixture of raw industrial and warm materials such as steel and timber
  • pendant lighting system - able to be changed to task lighting
  • not a lot of fixed furniture, more moveable type to adapt to artists needs.

Thursday, 13 September 2012

[15] Synchronising Landscape Model to Central


Grant: "In my landscape model go to                         Manage
                                                                                Manage links
                                                                                Select the Model (architecture for example)
                                                                                Reload from this address
 
                            \\studentshare\ed-studentshare\BEB-212\BDS\Drawings\BIM Models\Revit Files

                                                                                select the model
                                                                                Hit "OK"


Wednesday, 12 September 2012

[14] Progressing the Interior Model

Apartments
- layout
       - how many bedrooms?
       - bathrooms?
       - kitchen size/location?
       - laundry?
       - living / dining?
       - any other spaces? - study? studio?
- finishes
        - floor finishes
        - wall finishes
        - ceiling finishes
- fixtures
        - bathroom fixtures
        - kitchen fixtures
- furniture
        - loose furniture
        - fixed furinture

Studio Spaces
- layout
      - what needs to be included in this space?
      - multi-functional/flexible (research how these spaces will be used)
      - kitchenette size/location
      - bathroom
      - sleeping area?
- finishes
        - floor finishes
        - wall finishes
        - ceiling finishes
- fixtures
        - bathroom fixtures
        - kitchen fixtures
- furniture
        - loose furniture
        - fixed furinture
- doors
     - dividing doors
     - entry doors

Gallery Spaces
- layout
      - what should be included in these spaces permanently?
- doors
     - dividing doors
     - entry doors
- finishes
        - floor finishes
        - wall finishes
        - ceiling finishes

 Foyer/Cafe 
- finishes
        - floor finishes
        - wall finishes
        - ceiling finishes
- fixtures
        - bathroom fixtures
        - kitchen fixtures
- furniture
        - loose furniture
        - fixed furinture
- doors
     - dividing doors
     - entry doors

[13] Setting up Central Files

Creating Worksets
The first step in creating a central file is to set up worksets. This is done through the collaboration tab in revit, and worksets. We have opted to just keep the standard "workset 1" and "shared levels and grids" worksets and not to set up more for this stage. If in the future worksets are needed then they will be added as the project progresses.

Saving Central File
The central files were saved in \\studentshare\ed-studentshare\BEB-212\BDS\Drawings\BIM Models\Revit Files. This central location is accessible from any computer on the QUT network, meaning when we are in class we can work on our local files which are able to update the central file on student share drive. The naming convention for central files includes "CENTRAL" at the end of each file name  eg "MCN_Architectural Model_CENTRAL.rvt" (the same convention is used for local files but with "LOCAL" at the end of each name.  This ensures users are aware of whether they are accessing the central or local file.

Reloading Links
As the files were moved and saved in a different location with a different name this interupted the links within the models as the file locations did not match up. This issue was easily fixed by going to the manage links window and choosing "reload from" to update the file path and name to the central models.

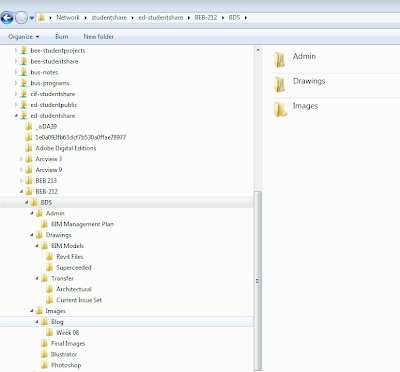
[12] Central file location


Creating File Structure in Central Location

The studentshare server is now accessible for our class, this means we now have a central location to save our project files instead of using Dropbox.

Our file structure has been implemented into this location with 3 main folder "admin", "drawings' and "images". Within these folders is a filing system as per our previous blog post for our team to use for the MCN project. 

The central location is extremely cruicial in the step to creating central files for our revit models. Previously without a student file share server we were not able to set central files up as there was no central location for the local files to connect back to and update. We are now able to work on the same model at the same time through the creation of central and local files.